A person eats thousands of meals in a lifetime, but usually only a few really stand out as lasting memories. My first experience with Dutch oven Cornish hens at a frontiersmen rendezvous reenactment outside Kansas City about 20 years ago was such a meal. To this day every time I think of, or someone mentions, a Dutch oven the first thing to come to mind is that meal.
Cast iron Dutch ovens are the perfect cooking tool for chunks of meat, whether it be poultry, beef, pork or wild game. The most common oven sizes are 12 or 14 inches, both offering plenty of room to prepare a meal for all but the largest family. A great thing about cooking this way is that the ovens can be stacked atop each other to allow more cooking space for larger meals.
That first meal of Cornish hen was prepared for two – myself and a fellow reenactor sharing a ride to a weekend event. He was an experienced rendezvous participant and packed a Dutch oven in his camp gear along with the usual canvas lean-to, wool blankets, hatchet and knife. On our way to the gathering we discussed our menu for the weekend and stopped at a grocery store just short of Kansas City for supplies. His suggestion was Cornish hens, potatoes, carrots and onions for supper that first night.
When we arrived in camp we dug a small fire pit, removed and set aside the turf in about a two-foot circle. We dumped 24 charcoal briquettes into a charcoal starter chimney and lit them. Next he pulled the well-used 12-inch oven out of his provisions. He placed a cast iron trivet inside on the bottom of the oven to keep the meat and vegetables from scorching as they baked.
We sliced up a couple sweet onions, halved four small potatoes, and quartered up a couple carrots. Next we took the hens out of the package and rinsed them off. We rubbed the flesh with a stick of butter, then sprinkled a light coating of salt and pepper on both the outside and inside. About a cup of water was dumped into the oven to provide moist heat. We positioned the birds side-by-side in the oven, then scattered the vegetables around them to form a nest of goodness. As a final step he gave the entire dish a dusting of seasoning salt.
By now the charcoal was covered with a white ash. We used a small shovel to dump half of the coals onto the soil in our fire ring. The loaded Dutch oven was set atop the coals. The remaining 12 coals were evenly spaced across the lid of the oven. For the next hour we about the business of setting up camp, stopping every 15 minutes or so to rotate the oven and lid a quarter turn in opposite directions.
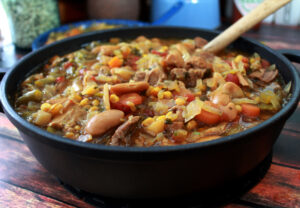
At suppertime we used a lid lifter and pair of leather gloves to remove the oven lid. There to greet us was two golden brown birds surrounded by succulent vegetables. Our meal was the envy of the encampment.

A couple weeks ago I fixed Cornish hens for my wife and daughter. This time I was cooking the meal inside my garage while working on a building project. Within 20 or 30 minutes of adding the briquettes to the top and bottom of the oven the smell of baking chicken was filling the shop. This time I layered some onion slices on top of the trivet in the bottom of a 12-inch oven, set the three Cornish hens in place, and filled in around the birds with potatoes and carrots. I poured a cup of water over the entire meal and finished with salt, pepper and Italian seasoning. I could have fit four hens in the oven if necessary, but three is a good number for a foot wide oven.
When cooking in my shop’s “clean room”, where I do a lot of my Dutch oven and other cast iron cooking at home, I use a sheet metal oil drain pan I bought just for the purpose of holding hot coals. The pan is about 24 inches across, so it will work with any of my ovens. I have a metal cart that holds my cast iron burners and other cooking gear. I place the pan on top of the cast iron burners to bring it up to a good height for working with the heavier Dutch ovens. Companies that sell Dutch ovens often offer specialty cooking tables – a metal table with extendable legs and sheet metal windscreens made specifically for Dutch oven use. Since I have the roller cart that I use for cast iron cooking over burners I just make use of what I already have on hand.

Since I was using a 12-inch oven I pre-heated 24 briquettes in my charcoal chimney. Once the oven was loaded I evenly spaced 12 briquettes on my cooking pan within a 12 inch circle, set the oven in place, and evenly spaced the remaining charcoal briquettes atop the lid. Every 15 to 20 minutes I rotated the oven and lid a quarter turn in opposite directions. An hour-and-a-half later the hens were turning a golden brown on top and the vegetables were tender when forked. Total initial prep time was about 5 minutes with little extra attention given during the cook time. And my garage smelled like baked chicken for a week – and that was a good thing.
Many times I’ve stacked ovens when cooking larger meals or multiple dishes at the same time. I’ve seen as many as five ovens stacked in use, but I hardly ever use more than three. To use multiple ovens simply place the bed of coals on bottom, and set the first oven in place. Next put the right number of coals on the lid and set another oven on top. Repeat the process again for each oven you add to the stack. The only drawback is the time it takes to unassembled the stack every 20 minutes or so to rotate the ovens and lids to avoid hot spots and assure even cooking.
By stacking you can easily bake up to 15 or 16 hens or other sizable chunks of meat at the same time for a large gathering. I also like to use three ovens to prepare a cake or dessert on bottom, the main meal in the middle oven (which will get slightly hotter than the bottom oven due to heat rising), and then add a third oven of biscuits or cornbread on top about 20 minutes before the main course will be done. When the meal is done remove the coals from all the ovens and set the dessert aside. The baking will slow and the oven will keep the dessert warm for an hour or more.
Whether it be pork chops, pot roast, Cornish hens or game birds, the process is the same. Anytime you’re “roasting” a piece of meat you’ll want to divide your briquettes between the top and bottom. Here’s four recipes to try with your Dutch oven. The one for Cornish hens is a slightly fancier version than I described earlier. And next time I’ll be discussing soups and stews.
Cornish Hens And Vegetables
Cornish hens washed and dried
3 Tbsp. melted butter
1 tsp. garlic powder or Italian seasoning
Salt and pepper (Lemon pepper is good, too)
2 large onions sliced
3 large potatoes, sliced in half
3-4 carrots washing, cut into 2 inch pieces
Melt butter and mix in garlic powder or Italian seasoning. Place onion slices on trivet in bottom of Dutch oven. Also place a couple onion slices inside the cavity of each hen. Brush butter and spice mix on outer surfaces of birds. Salt and pepper, also adding these spices sparingly to the cavity of the bird. Space hens evenly inside oven on top of onions. Place potato pieces between the hens, then add carrot pieces. Add lid. Place 12 hot coals beneath oven and 12 on top. Bake for one hour, rotating oven and lid every 15 minutes.
Easy Pork Chops
6 pork chops
1 box Stove Top stuffing (or similar brand)
4 Tbs. melted butter
1-1/4 cup hot water
1 Tbs. onion minced
1 20 oz. can sliced peaches
1/4 cup apricot preserves (or preferred fruit preserves)
Salt and pepper
Place stuffing mix in 12-inch oven. Add butter, water and juice from can of peaches, and stir mixture together. Season chops with salt and pepper. Place on top of stuffing. Mix onion, mustard and preserves together in separate bowl, then spoon over top of chops. Add peach pieces on top. Cover with lid. Bake at 350 degrees (12 briquettes top and bottom) for one hour, rotating oven and lid every 15 minutes.
Baked Chicken And Rice
8 assorted pieces chicken
2 cups long grain rice
3 cloves garlic
1 can each Cream of Mushroom/Cream of Chicken soup
1 small onion diced
1 stalk celery chopped
2 cups water
Salt, pepper and poultry seasoning
In a 12-inch Dutch oven add rice, onion, garlic, water and soups and stir. Add salt, pepper and poultry seasoning to chicken pieces. Place chicken pieces on top of rice mixture and cover with lid. Bake using 24 briquettes (half on top/half on bottom) for 90 minutes rotating oven and lid quarter turn every 15 minutes.
Dutch Oven Pot Roast
3 to 4 lb. chuck roast
3 Tbs. bacon grease or cooking oil
2 med. onions sliced
6 med. red potatoes cut into chunks
3 Tbs. brown sugar
1 pound carrots cut into short lengths
1/4 cup barbecue sauce
1 cup beef stock
Salt, pepper, parsley flakes, thyme, rosemary (dry)
Preheat oven with all briquettes on bottom until hot. Add bacon grease, onions and rosemary and cook approximately 2 minutes, then add garlic and cook additional 1 minute. In a separate dish combine beef stock, barbecue sauce, brown sugar and pepper, stir together and pour into oven. Salt and pepper roast and add to oven. Cover with onions. Place lid on oven. Move half the coals to the lid. Bake approximately 30 minutes, rotating oven and lid after 15 minutes. Remove lid and add potatoes and carrots, season with salt, pepper, 1 Tbs. thyme and 1 Tbs. parsley flakes. Replace the lid and bake another 60 minutes or until vegetables are done.