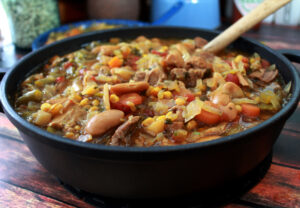
Just like a simmering pot of homemade soup or stew on a cold day says warmth and contentment, often called comfort food, you can just sense that a meal prepared in a Dutch oven is going to taste good.

Any meal you normally cook or bake in other cookware can be made in a Dutch oven or cast iron cookware. We are talking breads and biscuits this time. In summer, we often make a skillet of cornbread on the barbecue while grilling steaks. And I have a great Dutch oven recipe for pineapple upside down cake that I like to make when company stops by and we get the homemade ice cream freezer out and crank up a batch.
The key to Dutch oven cooking is learning to achieve and control the heat. There’s an easy formula I’ll explain a little later. After learning how to regulate heat, it is just a matter of adapting your favorite recipes for the size of your cast iron oven. A side benefit is that cleanup is often easier than with other pots and pans.
This raises the question, how do you apply a non-stick finish on a pot or pan made of rough cast iron? You bake it on, that’s how. It’s called “seasoning” and if done properly a piece of cast iron cookware will have a nearly stick-free surface comparable to or better than the latest Teflon coating. With a seasoned oven, cornbread or biscuits will come out leaving the cook surface almost spotless. Even sticky desserts or soups and stews will clean up with little effort.
New cast iron cookware will come one of two ways: in need of seasoning, or preseasoned. If you buy older cookware at a flea market, yard sale or resale shop, it will most likely need seasoned again. The same holds true if at some time in the past the cookware was improperly stored and drew moisture. Cast iron should be properly seasoned and stored in a dry place or it can rust. An oven stowed away without being properly cleaned, or with an excessive oil coating, can turn rancid. Either problem is easily fixed with a little elbow grease and a few minutes of your time. And if seasoned properly and stored in a dry place the cookware can give a lifetime of use with little additional attention.
Here are some simple rules:

- Never use soap on cast iron cookware unless cleaning it prior to seasoning.
- After use simply wipe clean with a paper towel.
- If necessary, rinse with hot water only and allow to air dry.
- Coat all surfaces with a light film of cooking oil.
- Store in a dry place. If stored with a lid, fold a paper towel and place between the oven and lid to allow air to move in and out of the stored piece.
- But if you find yourself with an oven in need of seasoning, here’s the simple way to do the task. First clean the oven thoroughly. If rust is visible use emery cloth or steel wool. If rancid, use dish soap but rinse well afterward. You can season cast iron cookware in your kitchen oven, but you’ll quickly discover the process can emit a fair amount of smoke. I use my gas grill and it works great for the task. Place the dry cast iron pot or skillet in the preheated grill. If seasoning a Dutch oven, place the lid in the grill as well, but not sealed on top of the oven. You’ll want the grill to be about 350 degrees or slightly higher.
Warm the cast iron ware until it’s just too hot to handle with a bare hand. Preheating opens the pores in the cast metal and drives out any remaining moisture.
The next step is to cover all surfaces of the cookware with a light coating of cooking oil. Now place the oven back in the heat and leave it there for about 45 minutes. Remove from the heat. Allow the metal to cool naturally. There you have it! A seasoned piece of cookware. Following each use, clean as mentioned above and wipe down with a paper towel dipped in cooking oil. Wipe off any excess oil and store until the next use.
Now here’s the trick to regulating heat of a Dutch oven. As a rule of thumb, to achieve and maintain 350 degrees, you’ll need to take the size of the oven (12 inch, 14 inch, etc.) and double that number in briquettes. So to heat a 14 inch oven to 350 degrees you’ll need 28 briquettes. Use a charcoal chimney or barbecue grill to preheat the briquettes until they’re covered in white ash.
For baking (biscuits, rolls, breads, cakes) place one-third of the briquettes evenly distributed beneath the oven, and two-thirds dispersed atop the lid. For simmering (soups, stews, chili) reverse that order and put two-thirds of the briquettes beneath and one-third on the lid. For roasting (beef roast, pork shoulder, Cornish hen, etc.) evenly distribute the charcoal half on top and half beneath. Keep in mind that weather conditions such as cold and wind can affect heating properties of charcoal, so adjust as necessary.

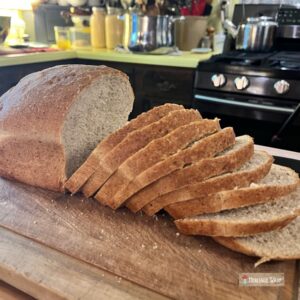
All that said, let’s look at some easy and great-tasting foods to bake in your Dutch oven. I grew up in a part of the country where biscuits were a part of everyday life. Grandma made biscuits at least once a day. Any leftovers were used at the next meal. Grandpa was a farmer and worked hard with his hands from sunup to sundown. Admittedly few people, myself included, work that way these days. I spend most of my working days sitting in my newspaper office at a computer. My wife teaches kindergarten. While she burns more calories than I do in a day, neither of us can justify eating biscuits every day. We’re more likely to bake a batch of biscuits to go with a large Saturday morning breakfast, or on a winter day when she’s off school because of bad weather.
If you have a biscuit recipe you can use it in a Dutch oven. If you don’t have a favorite recipe here’s a basic one I use.
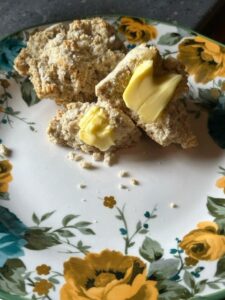
Simple Biscuits
2 cups self-rising flour
¾ cup shortening
1 ¼ cut milk
1/3 cup sugar
Put flour in a large bowl. Cut in shortening until broken down into small pieces in flour mixture. Add sugar and stir in. Add milk and stir together until dough forms evenly with no excessive wet or dry areas. Place dough mixture on floured cutting board. Roll or pat into a ¾ inch thick cake. Don’t overwork the dough. Use biscuit cutter or drinking glass to cut out biscuits. Place biscuits in greased Dutch oven leaving about a ½ inch space between rows.
For a 14 inch oven, preheat 28 charcoal briquettes. I prefer to light the briquettes and then mix the biscuit dough and fill the oven. By the time I’m finished the briquettes are ready to go. Place eight briquettes beneath the oven and 16 on the lid. Cook for 20 minutes rotating the lid and oven a quarter turn in opposite directions at the 10 minute mark to allow even heating. This recipe makes 12 biscuits.
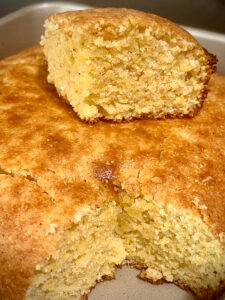
Easy Dutch Oven Cornbread
1 1/3 cup cornmeal
2 cups all-purpose flour
2 eggs
3 tsp. baking powder
1 1/3 cup sugar
2 cups milk
2/3 cup melted butter
1/2 tsp. salt
Cooking temperature: 350 degrees.
In a large bowl mix the cornmeal, flour, baking soda, sugar and salt. In another bowl stir together the milk, melted butter and eggs. Incorporate the dry ingredients into the wet ingredients and stir. Spoon the mixture into a lightly greased 12- or 14-inch Dutch oven and spread evenly. Preheat the appropriate number of briquettes for the oven being used and place one –third evenly distributed beneath the bottom and the remaining two-thirds on the lid. Every 15 minutes rotate the lid 1/4 turn, and then the oven the same amount in the opposite direction for even heating. Bake until the cornbread turns golden brown and a toothpick comes out clean. Consider whipping some butter and honey together and slather on slices of the warm bread. Serves 10-12, or five to six if they’re really hungry.
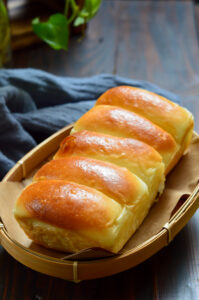
Garlic And Butter Rolls
1 lb. pizza dough (your favorite recipe or pre-made)
10 cloves chopped garlic
1 tsp. dried parsley
1/3 cup extra virgin olive oil
Salt
Cooking temperature: 350 to 400 degrees.
Divide pizza dough into 12 equal pieces. Divide chopped garlic cloves among dough pieces and press some pieces deep into the dough. Drizzle top of dough with olive oil and brush on tops evenly. Preheat charcoal briquettes in charcoal chimney or grill. Place one-third beneath oven bottom and two-thirds on lid. Bake 20 to 25 minutes. At 10 minute mark rotate lid and oven quarter turn in opposite directions to assure even heating.
Like I said earlier, any biscuit, bread or roll recipe can be adapted to a Dutch oven and you’ll be amazed that the end result seems to taste better than ever before. Next time we’ll discuss roasting chicken, beef, and other meats.