A few weeks ago we were sprouting our tomato seeds and pricking them out to be paired up in four inch pots. It’s likely that a few have died since then, but most of them ought to be lusty growing things by now, bearing one or more sets of true leaves. The first (immature) leaf set will be smooth-edged, but the second set ought to start looking like a familiar tomato leaf with its irregular serrated edge.
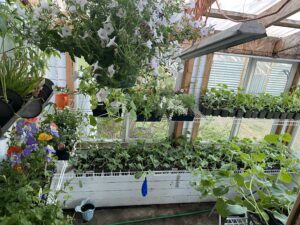
After ten days or so, your paired sprouts might do with a little more food. Give it to them in the form of very dilute liquid fish emulsion. It’s an excellent and widely available fertilizer, but may prove an issue if your sprout pots are still in the house in that sunny window (particularly if they don’t have a catch basin under them) or if you have a cat that finds them now strangely and irresistibly interesting thanks to the fish. A greenhouse, even a small one barely big enough to stand up in, is a terrific boon to have for these occasions; the next best thing is making use of a friendly neighbor’s greenhouse.
You can also cobble together a temporary greenhouse enclosure out of boards and old windows, out in the yard or on the back porch. The sprouts don’t mind cool temperatures as long as they don’t go below about forty degrees for long and they can still get sun, but be prepared to bring them back indoors again if the deep cold looms.
When they’re about three or four inches tall, these juvenile tomato vines need potting-up once again. This time they will move up to the 1-gallon pot size. Once more I employ the same potting mix I used for the last step, but this time I augment it with an extra 20% of its volume in finished compost from my compost heap and garden soil thoroughly mixed. This substantially enriches the planting mix and makes it a bit more dense; also, it introduces some of the many microorganisms that will help the tomato plant to flourish in your organic vegetable garden.
Loosely fill each 1-gallon pot nearly to the top with this new enriched mix, suitably dampened, and with two fingers wiggle out a fairly large hole in the middle, about three inches deep. When all the new pots are prepared, gently winkle two juvenile tomato plants from a four inch pot by holding it upside-down and depressing the bottom, catching the emerging pair between outspread fingers as they slide out, or simply cut the four inch pot down one side with scissors. Once again, you must wash off before you handle your plants, especially if you’re a smoker.
Carefully wriggling the two plants apart, try to separate them with as little damage to their rootlets as possible and keeping as much potting mix as possible around the roots. Set each separated juvenile plant into the well in the center of a 1-gallon pot. It’s recommended to bury them as deep as the first set of branches; any stem which is buried will quickly sprout roots, which will both help to feed the tomato vine and make it more sturdy. Thump the 1-gallon pot gently onto the table, which should collapse the well walls evenly around the transplant, and fill in with more mix as necessary to make a level surface. Water, and set in the sun.
These second-stage transplants still need to be brought in when the cold of night threatens; they can stay out in an unheated greenhouse during a frost, as long as temperatures within don’t go below the high thirties for long. One trick to help them through a very cold night is to light a large candle out in the greenhouse –those big tall votive candles in the glass containers work well for this— and place a big terracotta pot upside-down over it, resting on a small stick. The gap makes a good air inlet. The pot heats up and gently radiates its warmth all around itself throughout the night, and there’s little or no danger of fire.
You should feed your juvenile tomatoes once a week, again with very dilute liquid fish emulsion. If any of them start to grow a bit too much to hold themselves up, stop fertilizing, and pinch back any flowers that may develop. These will be the tomato vines to set out in the garden first.
The threat of frost should be dwindling in your area by now, though still present. It’s time to choose where you intend to have your tomato plants growing in the garden, and get the planting beds into shape. Double-digging is the method of choice for this. You will need a shovel, a digging fork, and a wheelbarrow.
First, pull out any weeds in the bed and toss them onto the compost heap. Then with the shovel, excavate a trench right across one end of your planting bed, the width and depth of the shovel blade (usually about ten inches). Put all this topsoil you dig up into the wheelbarrow, and roll it down to the other end of the bed; leave it there in the barrow. Come back to where you started and use the digging fork to loosen up the subsoil in the bottom of the trench, without removing it. Then take the shovel, and excavate a second trench directly adjacent to your first one, putting the newly dug up topsoil right into your first trench. Having been loosened up by shoveling, it ought to mound up a little higher than the original level of the bed.
Again, use the digging fork to loosen the subsoil in the bottom of the second trench. And then with the shovel, excavate a third adjacent trench, putting this newly dug up topsoil into the second trench. Loosen the third trench’s subsoil with the fork. Do you see where this is going? You will soon work your way to the other end of your planting bed one trench at a time, where you will leave one final open trench. Fill in this last trench with the contents of the wheelbarrow. Then call it quits for the day.
The next morning (and believe me, you’ll want a rest after some double-digging) you’ll need to fertilize and amend the soil. Just sprinkle your fertilizer of choice directly onto the bed along with about three or four inches of finished compost, then use a hoe or the digging fork to work this stuff into the topsoil but no deeper. Sprinkle with the hose, if some rain isn’t likely. Let this “rest†for about a week or two, during which time any weed seeds will sprout and can be easily removed.

Chicken manure, kelp meal, fish emulsion and such-like are fertilizers, which supply nutrient directly to the growing plants. Compost isn’t a fertilizer — in fact it can be nearly nutrient-free, depending on what it’s made from. It’s vital as a soil amendment, and its use is to improve structure and friability, give greater water retention, introduce organic matter, and help feed the trillions of living microorganisms that should be thriving in your organic topsoil. These organisms will in turn contribute substantially to the health and well-being of your tomato vines.  They are what changes your ‘dirt’ into ‘soil.’
Ideal tomato compost must be started the year before: it seems that tomatoes really like being planted in soil that’s enriched with compost made from last year’s tomato vines.
Meantime, your juvenile tomato plants will be getting satisfyingly huge in their 1-gallon pots. Be sure to pinch out those too-early flowers that emerge, and take care that their branches don’t interweave with the pots sitting too close to one another.  They’re easily broken when you come to separate them.
NEXT TIME:Â Setting out and staking…