Tis the season! The garden is sprouting and I am looking forward to restocking my pantry. Though in my area green beans are just sprouting there are some of you who may be beginning to think about canning them. I thought I’d talk about one of the most common question I receive.
How do you water bath can green beans?
This question is asked quite often, in varying formats.
I canned green beans for the first time this year using the water bath method. They were all sealed for almost a week and now they are all unsealing. The beans inside smell rotten. Why are they unsealing?
I don’t have a pressure canner. How long do I need to boil jars of green beans?
My parents canned green beans without a pressure canner, why can’t I?
Many people used to water bath can green beans. To do this they processed it for a very long time (several hours) in a water bath canner.
I don’t recommend that you do this for one very important reason. Green beans are a low acid food.
Low acid foods contain very little natural acid. Botulism is a type of food poisoning caused by spores on your food that thrives in low acidity. Botulism is a serious risk. It can be fatal!
A pressure canner obtains the high level of heat necessary to kill those spores and prevent botulism. A water bath canner does not… it is that simple. Pressure canning = high heat. This is why it is important to process low acid foods (including green beans) by using a pressure canner. Please don’t try to can using a water bath. It is not worth the risk.
If you don’t have a pressure canner you do have options. You might consider freezing your green beans or you can even consider using dilly beans which are a pickled product that can be safely processed in a water bath canner.
Step by Step Instructions for How to Can Green Beans With a Pressure Canner
- First wash beans in cold water and snap them to the desired size. I like to snap mine to about 2 inches. They fit nicely into the jars at that length. You can also leave them jar length if you prefer.
- Add salt to your jars. A ½ tsp for pints or 1 tsp for quarts. Salt is optional. If you rather leave it out due to dietary restrictions that is perfectly safe.
- There are 2 ways to pack your jars. Either hot or cold pack. I prefer cold packing. Some people prefer to hot pack their jars because you can generally get more beans in each jar. It is simple personal preference.
- To hot pack, boil beans 5 minutes. Drain and pack hot beans into jars. To cold pack (raw pack), fill jars tightly with raw beans.
- Cover with boiling water leaving 1-inch head space. Remove air bubbles in your jars by running a plastic utensil down inside the jar between the jar and the beans.
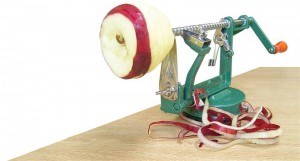
- Press lightly to release trapped air. I like to use a orange peeler. You could also use a plastic knife or the handle to a spatula. Any straight thin plastic instrument.
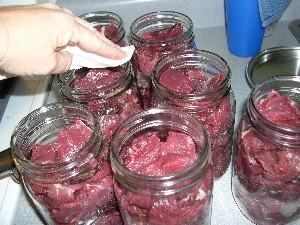
- Wipe the rims of your jars clean with a cloth or paper towel and place canning lids on your jars.
- Put the filled jars on the rack in a pressure canner. The canner should already have about 3 quarts of hot water in the bottom.
- Place the cover securely on the canner. Heat to boiling. Do not place the weights on yet. At this point steam should be escaping from the vent or the weighted gauge opening.
- Allow steam to vent for 10 minutes.
- Close the vent or put on your weighted gauge and let the pressure build.
- When the canner reaches correct pressure, lower your heat to maintain that pressure.
- NOW start timing.
Pints – process for 20 minutes
Quarts – process for 25 minutes
| Adjustments for Pressure Canner | ||
| Altitude in Feet | Dial Gauge Canner | Weighted Gauge Canner |
| 0-1000 | 10 | 10 |
| 1001-2000 | 11 | 15 |
| 2001-4000 | 12 | 15 |
| 4001-6000 | 13 | 15 |
| 6001-8000 | 14 | 15 |
| 8000-10,000 | 15 | 15 |
When time is up, turn off the heat. Do not remove weights or open petcock. Leave everything alone until the pressure comes back to zero.
You may now remove the weight or open the vent. Then wait two minutes. Carefully remove the lid, CONTENTS ARE HOT AND STEAMY. Tilt the lid so the steam will not hit you in the face.
Using a jar lifter, carefully remove the jars and set upright on a wooden board or a thick towel to cool. Be sure they are in a draft free area and leave 1 to 2 inches space between each jar so air can circulate.
Listen…
Did you hear it? This is my favorite part. As the jars cool the seals will make the coolest little pinging sound. For some odd reason I love that sound. It is so satisfying. It means all my work is working!
Leave the jars alone until completely cool. I leave mine on the counter overnight. I love waking up in the morning to the jars sitting out on the counter with the morning sun shining off of them.
Label the jars with date and store.
Now that you have an abundance of green beans canned for the winter, think about what you are going to can next!
Editor’s Note: Always follow USDA recommendations when canning.


I am brand new to the pressure canner canning. What’s the best size to start with? Wish I lived closer so I could take your classes!
@Marie: Contact your local farm extension agency they often have or know of classes in your area. @Lehman’s: Our green beans, an old variety called “Rattlesnake”, just started coming in here in NC. Put some up yesterday using a pressure cooker so good timing on the article. I look forward to one day cooking them on one of your Elmira or Waterford wood cookstoves.
[…] to Can Your Own Soup Cooked in the Jar Potato Soup Home Canning Re-fried Beans Canning Green Beans Peach Jelly the Easy Way Apricots in Honey Syrup 3 Bean […]
You might try checking with your neighbors about borrowing a pressure canner. For years I had 2 neighbors who were willing to share should one of us had a glut of beans, tomatoes, beets, carrots, etc.
I PC 3 ers of green beans today 25 min at 15 lbs of pressure. I live on a mtn. All the liquid in my jars disappeared. The kids pinged, but where did the water go. My first attempt at PC.
This is a very clear explanation of pressure canning green beans that should help those who are just starting out!
I had been canning tomatoes and fruit in a water bath canner for years before I decided to try pressure canning. If you follow the directions, everything will be fine!
How long can u store canned goods
Great question, Sharon! Canned foods are shelf stable for 1-3 years.