Canning season is coming up soon, and maybe you’re a new canner who wants to start off slow and save your harvest. I wanted to try my hand at canning for the first time, but it’s still a little early for my vegetables to be harvested, so I looked around my yard for something to use and the perfect little plant was there: dandelions!
Now, I am sure you are thinking, “Isn’t a dandelion a weed? Why would I ever eat that?” and I am here to tell you, it is a delicious weed! Don’t go out, though, and pick a dandelion and start munching—we’re going to make some jelly!
Dandelions are one of the first flowers to bloom in spring and early summer, and while many people treat them as a nuisance in their lawns, they are completely edible from root to flower. Their bright yellow petals have a mildly sweet, honey-like flavor, which makes them perfect for jelly.
If you’re looking for a slow, satisfying way to begin your canning journey, dandelion jelly is a great place to start. Not only is it beginner-friendly, but it also brings a little sunshine into your pantry, or makes a great gift!
Gathering and Preparing Dandelions

Before you begin, make sure you’re harvesting dandelions from an area free of pesticides, herbicides, or pet waste. You’ll want the freshest, cleanest blooms you can find. A sunny day is best when the blossoms are fully open.
You’ll need about 2 to 3 cups of dandelion petals. To collect them:
- Pick around 4 cups of dandelion heads.
- Snip off the yellow petals, avoiding as much green as possible—the green parts can
be bitter. - Rinse the petals gently in cold water to remove any insects or dirt.
Dandelion Jelly Recipe
Ready to get started? Follow this simple steps. (You can find a printer-friendly recipe with a full ingredient list at the end.)
Instructions:
- Make a dandelion infusion: In a saucepan, bring 4 cups of water to a boil. Add the dandelion petals, remove from heat, cover, and let steep for 24 hours. This will become your “tea.”
- Strain the petals: After 24 hours, strain the petals through a fine mesh strainer or cheesecloth, pressing to extract as much liquid as possible. You should have about 3 to 3.5 cups of dandelion tea.
- Prepare your jars and heat your lids: While you prepare the jelly, sterilize your canning jars. Even if they are brand new, you need to sterilize your jars. I do this by putting my jars in the oven at 275 for 15 minutes. You can also run them through your dishwasher or boil them for 15 minutes on the stove. I find the oven is the easiest method for me. While your jars are being sterilized, heat your lids in a pot of water on low heat on your stove. This helps your lids seal better.
- Cook the jelly: In a large pot, pour in the dandelion tea. Add lemon juice and pectin, and bring to a rolling boil over high heat. Stir constantly.
- Add sugar: Add all the sugar at once, stirring until dissolved. Return to a rolling boil and boil for 1-2 minutes. Remove from heat.
- Fill jars: Ladle the hot jelly into hot, sterilized jars, leaving about 1/4 inch headspace. Wipe rims clean, place lids on top, and screw bands on fingertip-tight.
NOTE: It is critical to remember to always fill your jars when they are hot, and the contents of the jar are also hot. NEVER mix temperatures. Hot food, with hot jars only. Cold food with cold jars only. We are doing the classic canning method with hot jars and hot contents. (Always follow USDA recommendations when canning.)
How to Water Bath Can: Step-by-Step

Water bath canning is the method used for high-acid foods like fruits, pickles, and jams. It’s safe, simple, and doesn’t require a lot of special equipment.
You’ll need:
- A water bath canner and canning rack
- Canning jars with lids and bands
- A jar lifter or tongs
- A chopstick or knife
- Water bath canner and canning rack
Step 1: Prepare the jars and lids: Wash jars, lids, and bands with hot soapy water. Sterilize your jars and warm your lids on the stove. Keep the jars warm until you’re ready to fill them to prevent cracking when hot liquid is added.

Step 2: Fill the canner: Place a rack or folded towel at the bottom of your pot to keep jars off the direct heat. Fill the pot with enough water to cover your jars by at least 1 inch. Bring the water to a simmer while you prepare your jelly.

Step 3: Fill and seal jars: Once your jelly is cooked, fill the hot jars with jelly, wipe the rims clean with ¼ cup water mixed with a tablespoon of white vinegar, and apply the lids and bands. Only tighten the bands with your fingertips until the jar moves slightly. Do not over tighten.

Step 4: Process in water bath Using a jar lifter, gently place the jars into the simmering water. Make sure the water covers the jars by at least 1 inch. Bring to a full rolling boil and process for 10 minutes (adjusting for altitude if needed). Do not start timing your canning process until the water is at a full rolling boil.
Step 5: Cool and check seals Carefully remove the jars and place them on a towel to cool for 12 to 24 hours. You’ll hear the satisfying “ping” as the lids seal. Once cool, check the seals by pressing the center of each lid. If it doesn’t flex, it’s sealed. Store sealed jars in a cool, dark place. Be sure to date and label your jars!
Enjoy Your Jelly!
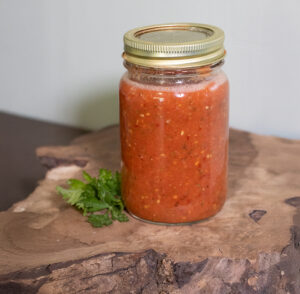
Once set, your dandelion jelly will have a light, floral, honey flavor—a perfect topping for toast, biscuits, or even stirred into tea. Not only does it taste like sunshine in a jar, but it’s a sweet reminder that good things can come from unexpected places.
So, if you’re dipping your toes into the world of canning, don’t wait for your garden to harvest. Start now, with a handful of wildflowers and a little curiosity. Canning dandelion jelly is more than just preserving food—it’s preserving a moment of spring.
Print
Canning Dandelion Jelly: A Sweet and Simple Start to the Season
Ingredients
- 2 cups dandelion petals (packed)
- 4 cups water
- 2 tablespoons lemon juice
- 1 box (1.75 oz) powdered fruit pectin
- 4 cups granulated sugar
Instructions
- Make a dandelion infusion: In a saucepan, bring 4 cups of water to a boil. Add the dandelion petals, remove from heat, cover, and let steep for 24 hours. This will become your “tea.”
- Strain the petals: After 24 hours, strain the petals through a fine mesh strainer or cheesecloth, pressing to extract as much liquid as possible. You should have about 3 to 3.5 cups of dandelion tea.
- Prepare your jars and heat your lids: While you prepare the jelly, sterilize your canning jars. Even if they are brand new, you need to sterilize your jars. I do this by putting my jars in the oven at 275 for 15 minutes. You can also run them through your dishwasher or boil them for 15 minutes on the stove. I find the oven is the easiest method for me. While your jars are being sterilized, heat your lids in a pot of water on low heat on your stove. This helps your lids seal better.
- Cook the jelly: In a large pot, pour in the dandelion tea. Add lemon juice and pectin, and bring to a rolling boil over high heat. Stir constantly.
- Add sugar: Add all the sugar at once, stirring until dissolved. Return to a rolling boil and boil for 1-2 minutes. Remove from heat.
- Fill jars: Ladle the hot jelly into hot, sterilized jars, leaving about 1/4 inch headspace. Wipe rims clean, place lids on top, and screw bands on fingertip-tight.
Notes
NOTE: It is critical to remember to always fill your jars when they are hot, and the contents of the jar are also hot. NEVER mix temperatures. Hot food, with hot jars only. Cold food with cold jars only. We are doing the classic canning method with hot jars and hot contents. (Always follow USDA recommendations when canning.)


I’ve never canned before, what is the knife or chopstick used for?
Great question, Donna! You will use the knife or chopstick to remove any bubbles you might have in your jar.